Controlling a Bitcoin Miner with Home Assistant: Surplus, Electricity Price and Temperature in One Automation
By Lukas Henning · 02. October 2026 · 18 min read
A small Bitcoin miner is the most grateful load a smart home can have: it needs no warm-up, has no cycle that must not be interrupted, and accepts any power level between "off" and "full". That is exactly why it fits so well into Home Assistant. In this tutorial you build an automation that controls a Bitaxe, Nerdaxe, NerdQaxe or NerdOctaxe by three quantities: solar surplus, the current electricity price and temperature. At the end the miner runs at full power when the sun supplies the electricity or it is cheap on the exchange, throttled when only a little surplus is available, and not at all when every kilowatt-hour costs 37 cents or the home office is already warm.
The maths behind it, meaning what a kilowatt-hour is worth in a miner and which miner fits which system, is in our guide Bitcoin mining with solar power. This article is about the implementation. All YAML examples are written so you can copy them and only adjust the entity names. They assume a current Home Assistant installation, whether on a Raspberry Pi, a Home Assistant Green or in a virtual machine.
What you need
The automation needs four data sources. Only the first is mandatory; you add the other three as needed.
| Building block | Purpose | Typical source |
|---|---|---|
| Miner | read power, hashrate, temperature; set frequency and voltage | AxeOS interface of the miner, via HACS integration or REST |
| Surplus | production minus house consumption | inverter integration, OpenDTU for Hoymiles, meter reading head, Shelly 3EM, Tibber Pulse |
| Electricity price | compare hourly price with threshold price | Tibber integration (with contract) or EPEX Spot integration (without contract) |
| Temperature | protect the miner from heat, do not overheat the room | chip temperature from AxeOS, room sensor (Zigbee, Shelly H&T, anything) |
The four building blocks of the automation. Without a solar system and without a dynamic tariff, the temperature and time control remains, which is useful on its own.
On the hardware side, a miner with AxeOS firmware on the same network as Home Assistant is enough. Give it a fixed IP address in your router, otherwise the configuration points nowhere after the next restart. Any device from the Bitaxe and Nerdaxe family works, from the Bitaxe Gamma 601 at 17 watts to the NerdOctaxe at 200 watts. The larger the miner, the more the control pays off, because every hour on grid power costs more.
Step 1: Connect the miner
The most convenient route is the AxeOS HA Integration, an open-source project under the MIT licence. You add the repository in HACS as a custom repository, install the integration, restart Home Assistant and add the miner by its IP address. You then have over 80 sensors (power, hashrate in several averages, chip and voltage regulator temperature, shares, difficulty) plus control entities for fan, frequency and core voltage and a restart button. The integration is developed for Bitaxe and Nerdaxe; NerdQaxe and NerdOctaxe speak the same AxeOS API, so the sensors work there as well.
If you prefer not to install an integration or want to understand what happens under the hood, connect the miner directly through its HTTP interface. AxeOS returns a JSON with all operating data at /api/system/info and accepts new settings at /api/system via PATCH; the full description is an OpenAPI file in the ESP-Miner project. In Home Assistant that is one REST sensor and two REST commands in configuration.yaml:
# configuration.yaml
sensor:
  - platform: rest
    name: bitaxe_info
    resource: http://192.168.1.50/api/system/info
    scan_interval: 30
    value_template: "{{ value_json.hashRate | round(0) }}"
    unit_of_measurement: "GH/s"
    json_attributes:
      - power
      - temp
      - vrTemp
      - frequency
      - coreVoltage

rest_command:
  bitaxe_set:
    url: http://192.168.1.50/api/system
    method: PATCH
    content_type: "application/json"
    payload: '{"frequency": {{ frequency }}, "coreVoltage": {{ voltage }}}'
  bitaxe_pause:
    url: http://192.168.1.50/api/system/pause
    method: POST
  bitaxe_resume:
    url: http://192.168.1.50/api/system/resume
    method: POST
Turn the REST sensor's attributes into entities of their own with template sensors, so you can use them in conditions and in the energy dashboard:
template:
  - sensor:
      - name: "Bitaxe Power"
        unit_of_measurement: W
        device_class: power
        state_class: measurement
        state: "{{ state_attr('sensor.bitaxe_info', 'power') | float(0) | round(1) }}"
      - name: "Bitaxe Chip Temperature"
        unit_of_measurement: "°C"
        device_class: temperature
state: "{{ state_attr('sensor.bitaxe_info', 'temp') | float(0) | round(0) }}"/api/system/pause and /api/system/resume exist in newer AxeOS versions. They halt mining without cutting power to the miner; the power draw then drops to a few watts for processor, WiFi and display. If your firmware lacks the call, use a switchable socket as the entity switch.bitaxe_socket instead. Whether a changed frequency takes effect immediately or only after a restart depends on the firmware version; if in doubt, append the restart call /api/system/restart to the command. Give the entities meaningful names before you write the first automation, because later renames ripple through all rules. With several miners, a scheme of device and room has proven useful, such as sensor.gaia_office_power. Also enter a fixed IP address for each miner in your router and note it in the configuration as a comment; the hostname from AxeOS is more convenient, but not every router resolves it reliably, and an automation that runs into nothing does not report itself.
Step 2: Create the surplus sensor
The surplus is your system's production minus the house consumption. Most inverters provide production through their own integration (Fronius, SMA, Kostal, Huawei, Enphase are included in Home Assistant). For Hoymiles micro-inverters, as found on most balcony kits, OpenDTU is the solution: a small ESP32 that reads the inverter by radio and reports the values to Home Assistant via MQTT, with auto-discovery. House consumption comes from a reading head on the digital electricity meter (for example with the Tasmota or Tibber Pulse integration) or a three-phase meter such as a Shelly Pro 3EM in the distribution board. If you only have a balcony kit, you can do without house consumption and use production minus a fixed base load.
One detail decides whether the control runs stably: the miner is itself part of the house consumption. When it runs, the measured surplus drops by its own power, and a naive rule would switch it off again immediately. So you add its power back to the surplus and get the surplus that would be available without the miner:
template:
  - sensor:
      - name: "PV Surplus without Miner"
        unit_of_measurement: W
        device_class: power
        state_class: measurement
        state: >
          {{ (states('sensor.pv_production') | float(0))
             - (states('sensor.house_consumption') | float(0))
             + (states('sensor.bitaxe_power') | float(0)) }}
With a meter that reports import and export separately it is even simpler: the surplus without miner is the current export power plus the miner's power. Check the sensor in the history for an hour before you build it into an automation. If it is negative in sunshine, production and consumption are swapped or in different units (W versus kW).
Step 3: Add the electricity price
The second condition is the price. If you have a dynamic tariff, you get your hourly price in Home Assistant through your supplier's integration; the Tibber integration, for instance, provides a price sensor with the current unit price and attributes such as the day's maximum and minimum. If you have no dynamic tariff but want to know when electricity is cheap on the exchange, use the EPEX Spot integration from HACS: it fetches hourly prices from freely accessible sources such as SMARD or Energy-Charts, with no contract at all, and provides sensors for price, rank and quantile of the current day.
The threshold price above which running from the grid no longer pays is your miner's return per kilowatt-hour: around 11 cents for a Bitaxe Gamma, around 15 cents for a Nerdaxe Gaia (as of September 2026, see the mining calculator). Store it as a helper entity so you can adjust it without editing YAML when price or difficulty move:
input_number:
  miner_threshold_price:
    name: "Miner threshold price"
    min: 0
    max: 0.50
    step: 0.01
    unit_of_measurement: "€/kWh"
    initial: 0.11
  miner_surplus_on:
    name: "Surplus to switch on"
    min: 0
    max: 500
    step: 5
    unit_of_measurement: W
    initial: 40
  miner_surplus_off:
    name: "Surplus to switch off"
    min: 0
    max: 500
    step: 5
    unit_of_measurement: W
    initial: 10
Important for your expectations: with an ordinary dynamic tariff in Germany the unit price stays above the threshold price even in the cheapest hours, because grid fees, taxes and levies of around 20 cents per kilowatt-hour are always added. The price condition therefore rarely applies on its own, mainly in the few hours with strongly negative exchange prices. Its main job in this automation is the other direction: switching the miner off safely when there is no surplus and electricity is expensive. What a dynamic tariff really brings for miners is the subject of a separate guide.
Step 4: Define temperature limits
The third condition protects the device and the people in the room. AxeOS monitors the chip temperature itself and shuts down when overheating, but you want to intervene earlier: a Bitaxe that shuts down from overheating and restarts after cooling produces a sawtooth of hashrate and silence in a warm summer room. It is better to drop to the throttled level from a threshold of about 65 degrees (adjust the value to device and cooling). Throttled, the chip runs cooler and more efficiently, and the hashrate stays steady.
Room temperature is the second limit and the more interesting one in winter. A NerdOctaxe at 200 watts noticeably heats a small home office; with a room sensor and an upper limit of, say, 22 degrees, the miner becomes an adjustable electric heater that delivers hashrate on the side. How much heat each device delivers and when that pays compared with normal heating is the subject of our guide on heating with the NerdOctaxe Hydro. For the automation here, a sensor sensor.office_temperature and an upper limit as input_number.miner_room_max are enough.
The fourth condition: time and presence
Besides surplus, price and temperature there is a fourth quantity that often tips the balance in practice: whether someone is in the room. A Bitaxe is quiet, a NerdQaxe ++ with its fan is audible, a NerdOctaxe in the bedroom at night is unwelcome. Home Assistant knows from motion sensors, phone location or a simple schedule when the room is in use, and the automation gets another line in the off condition: or is_state('binary_sensor.bedroom_occupied', 'on'). Conversely, the full-load level can be tied to absence: during the day, when nobody is home, the fan may spin up.
A schedule is also the right fallback when sensors fail. If the surplus sensor fails (state unavailable), the template returns 0 and the miner would stay off with expensive electricity, which is fine. But if the price sensor fails and you have no solar system, the automation would never switch the miner on. So an extra rule pays off: if the price sensor has been unavailable for more than an hour, a fixed schedule applies, say 11 a.m. to 3 p.m. in summer. The condition in Home Assistant is states('sensor.electricity_price') in ['unavailable', 'unknown'], and the hour comes from now().hour.
Step 5: The automation with three levels
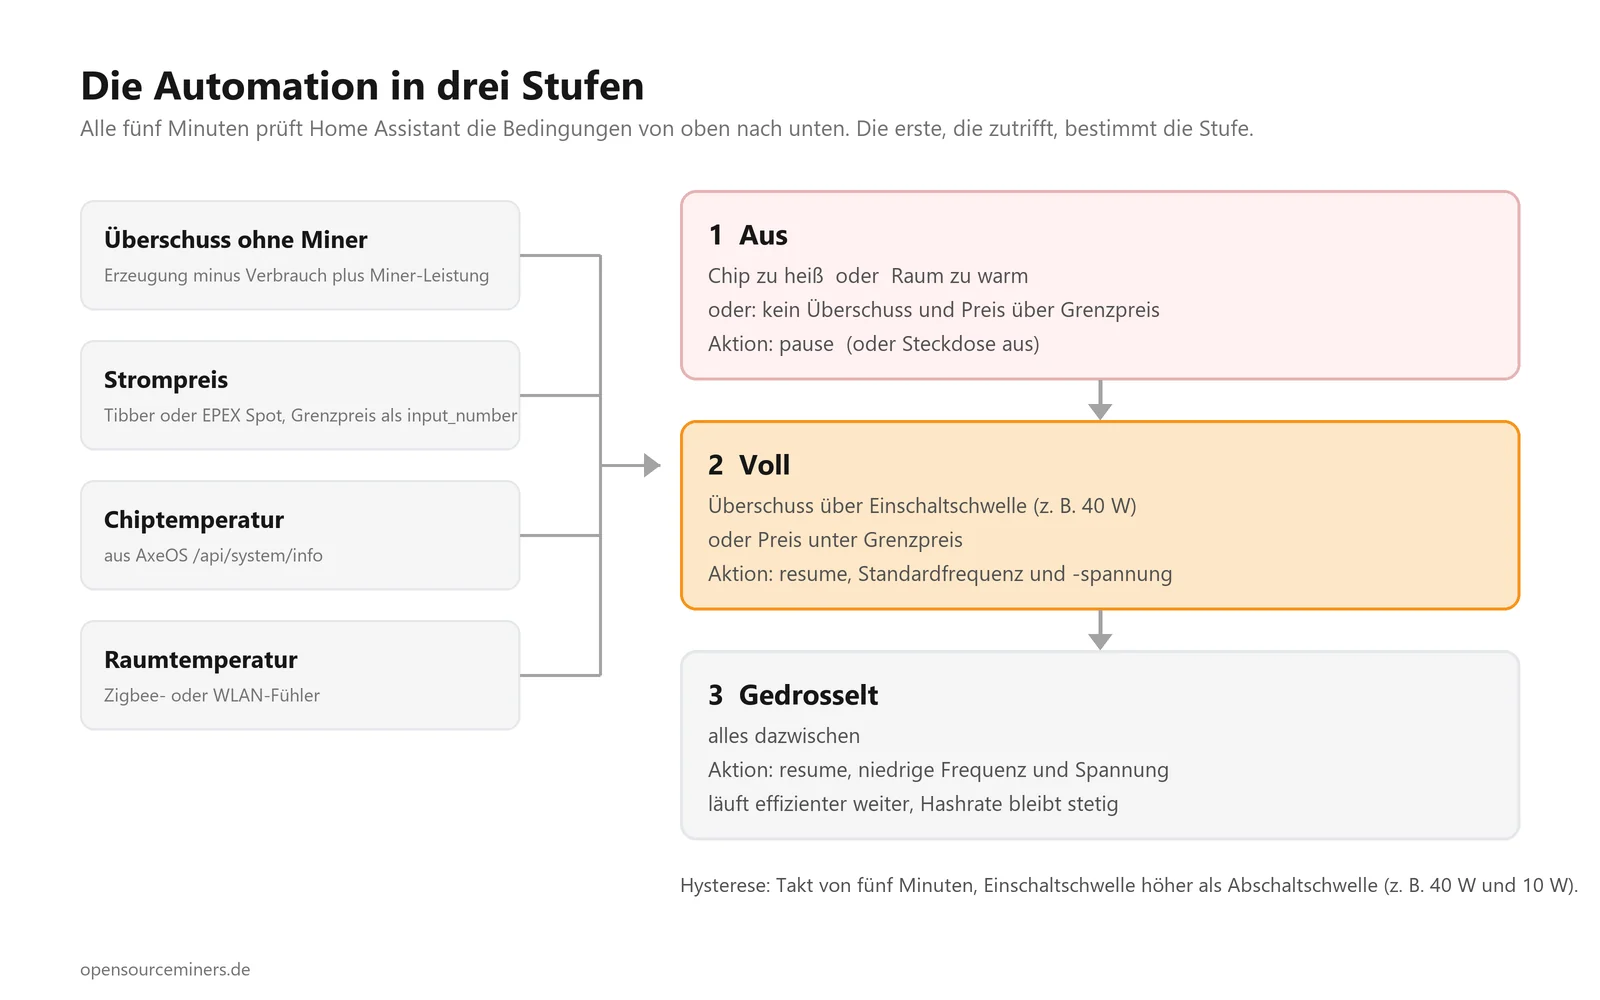
Now everything comes together. The automation runs every five minutes and decides between three levels: off, throttled and full. The five-minute cycle is the hysteresis: it prevents a single cloud from switching the miner and gives the hashrate time to settle after a change. On top come two different surplus thresholds, a higher one to switch on and a lower one to switch off, so the levels do not flip back and forth around a single value.
| Level | Condition (one is enough) | Action |
|---|---|---|
| Off | chip temperature above limit, room above limit, or: no surplus and price above threshold | pause or socket off |
| Full | surplus above switch-on threshold, or price below threshold | resume, default frequency and voltage |
| Throttled | everything in between | resume, low frequency and voltage |
The decision logic. "Off" takes precedence over "full", temperature beats everything.
automation:
  - alias: "Miner: surplus, price, temperature"
    mode: single
    trigger:
      - platform: time_pattern
        minutes: "/5"
    variables:
      surplus: "{{ states('sensor.pv_surplus_without_miner') | float(0) }}"
      price: "{{ states('sensor.electricity_price') | float(1) }}"
      threshold: "{{ states('input_number.miner_threshold_price') | float(0) }}"
      chip: "{{ states('sensor.bitaxe_chip_temperature') | float(0) }}"
      room: "{{ states('sensor.office_temperature') | float(0) }}"
      on_w: "{{ states('input_number.miner_surplus_on') | float(40) }}"
      off_w: "{{ states('input_number.miner_surplus_off') | float(10) }}"
    action:
      - choose:
          # Level off: too hot, or no surplus with expensive electricity
          - conditions: >
              {{ chip > 68 or room > states('input_number.miner_room_max') | float(99)
                 or (surplus < off_w and price > threshold) }}
            sequence:
              - service: rest_command.bitaxe_pause
          # Level full: enough surplus or cheap electricity
          - conditions: "{{ surplus > on_w or price < threshold }}"
            sequence:
              - service: rest_command.bitaxe_resume
              - service: rest_command.bitaxe_set
                data:
                  frequency: 525
                  voltage: 1150
        # Level throttled: everything in between
        default:
          - service: rest_command.bitaxe_resume
          - service: rest_command.bitaxe_set
            data:
              frequency: 400
              voltage: 1050
The frequency and voltage values in the example are starting values for a Bitaxe Gamma; Nerdaxe Gaia, NerdQaxe ++ and NerdOctaxe have different ranges. For "full", use the values AxeOS shows on your device in the factory state, and for "throttled" a pair well below that you have tested by hand beforehand. Always lower frequency and core voltage together: lowering only the frequency while leaving the voltage high saves hardly any power. Our experience values per device and the safe ranges are in the AxeOS tuning guide.
If you use the AxeOS HA Integration, replace the three REST commands with the integration's entities: number.set_value on the frequency and voltage entity, and instead of pause and resume either the socket or the lowest frequency level. The logic stays identical.
Step 6: Dashboard and monitoring
So you can see what the automation is doing, three things belong on a dashboard: the current level, the hashrate of the last hour, and the miner's power next to the surplus. Make the level visible by having the automation also set an input_select.miner_level; it then appears as text on the card, and in the history you can trace when and why it switched. Add the miner's power as an individual device to the energy dashboard. After a few weeks Home Assistant then shows you in black and white how many kilowatt-hours from the sun and how many from the grid ended up in the miner.
Two notifications are worthwhile too. First, a message when the miner should have been "full" for more than 15 minutes but the hashrate is below half its normal value: that is almost always a WiFi or pool problem, and without a message it goes unnoticed for days. Second, the message every solo miner is waiting for: AxeOS records a found block in its system data (the call blockFound/dismiss resets the display). A template sensor on that attribute, an automation on it and a push message to your phone are quickly built, and if you mine on our solo pool, you see the find there immediately as well.
After a month: take stock
The automation is only finished when you know what it achieved. After four weeks of operation, look at four numbers Home Assistant provides. First, the run time per level, readable from the history of input_select.miner_level: how many hours full, how many throttled, how many off? Second, the miner's kilowatt-hours from the energy dashboard, split by solar and grid share if your dashboard breaks down the source. Third, the average hashrate of the last 30 days as shown by your pool, which must match the run times. Fourth, the number of switching events: more than ten a day is a sign that the thresholds are too close together.
These numbers tell you whether the thresholds are right. If the miner almost never runs at full power, the switch-on threshold is too high or the device too large for the system; a lower throttle level that starts at 20 watts of surplus helps. If it frequently runs on grid power although the sun is shining, the surplus sensor calculates wrongly, usually because the miner is not subtracted or because the house base load at weekends is higher than assumed. And if the hashrate at the pool is well below what the run time suggests, the miner loses time after every start; then set the hysteresis to ten minutes and use the throttle level instead of pause.
What the automation brings per year: a worked example
Whether the effort pays depends on how large the miner is relative to the system. Take a NerdQaxe ++ at around 80 watts on a two-module balcony kit. Without control it runs around the clock and consumes about 700 kilowatt-hours a year. On such a balcony maybe 250 of those come from the sun, the rest, around 450 kilowatt-hours, from the grid. At 37 cents that is about 165 euros of electricity a year, against a pool return of around 60 euros (as of September 2026). So the miner loses a good 100 euros a year, and that is the normal case for an uncontrolled 80-watt device on a balcony.
With the automation from step 5 the same miner only runs when surplus is available: on such a balcony roughly 1,200 to 1,500 hours a year, throttled somewhat longer. It then consumes 100 to 150 kilowatt-hours, all from the sun, and earns 12 to 18 euros of pool return. A loss of a good 100 euros becomes a gain of 15 euros. That is not much money, but it is the difference between a hobby that costs money and one that does not. For the Bitaxe Gamma 601 at 17 watts the effect is smaller, because even uncontrolled operation costs only around 25 euros of grid power a year; here the control is more comfort than necessity. For the NerdOctaxe at 200 watts it is mandatory.
| NerdQaxe ++ on a balcony kit | without control | with automation |
|---|---|---|
| Run time per year | 8,760 h | ~1,200 to 1,500 h |
| Consumption | ~700 kWh | ~100 to 150 kWh |
| of which from the grid | ~450 kWh | 0 kWh |
| Grid electricity cost (37 ct) | ~€165 | €0 |
| Pool return | ~€60 | ~€12 to 18 |
| Result | ~€105 loss | ~€15 gain |
Worked example for an 80-watt miner on a two-module balcony kit, pool mining, as of September 2026. Solo mining has no running return, but the block chance.
The calculation also shows why throttling is so valuable: throttled, the NerdQaxe ++ needs considerably less power and therefore runs in surplus during many hours in which it would already be on grid power unthrottled. Efficiency in joules per terahash even improves when throttling, so the return per kilowatt-hour rises. From the sun's point of view, a throttled miner is the better miner.
Ready-made building blocks instead of DIY
You do not have to write the logic yourself. For the surplus part there are two mature open-source building blocks in Home Assistant that treat the miner like a wallbox or a heat pump.
- Solar Optimizer (MIT licence, HACS): The integration distributes the surplus across several devices and knows, besides on/off devices, adjustable loads with
power_min,power_maxandpower_step. That is exactly a miner with frequency levels. You specify minimum run time and minimum pause, and the optimiser decides with a cost model of import and export prices when the miner runs. The advantage over your own automation: washing machine, wallbox and miner are optimised together, and the miner gets the lowest priority because it pays the least per kilowatt-hour. - PV Excess Optimizer (blueprint from the Home Assistant forum): A blueprint you import and fill with sensors for production, import and the device's switch. It knows hysteresis, minimum run times and several devices in stages. For on/off operation on a socket it is set up in ten minutes; it cannot throttle via frequency levels.
Our recommendation: if you only want to control the miner, the automation from step 5 is the most transparent. If you run several loads on surplus, use Solar Optimizer and attach the miner as an adjustable device with the lowest priority.
Typical pitfalls
- The miner subtracts itself: surplus sensor without the miner's power, see step 2. Symptom: switching between on and off every five minutes.
- Price sensor unavailable: Supplier APIs fail occasionally, and a sensor in the state
unavailablebecomes 0 in the template, which looks like free electricity. That is why the example usesfloat(1)as the fallback for the price: if the sensor is gone, electricity counts as expensive, and the miner only runs on surplus. - Frequency does not take effect: Some AxeOS versions apply new values only after a restart. Then append the call
/api/system/restartand raise the hysteresis to ten minutes so the miner does not boot constantly. - WiFi at the installation site: A miner on the balcony or in the basement often has poor reception. A sensor polled every 30 seconds that only answers every few minutes makes every automation nervous. Fix reception first, then automate. Our troubleshooting guide shows how to check it.
- Several miners: Each miner gets its own automation and its own switch-on threshold, staggered by efficiency: the Nerdaxe Gaia switches on first, the Bitaxe GT last. That way the first kilowatt-hour of surplus always lands in the device that makes the most of it.
- Power supply and measurement: The power figure from AxeOS is the power behind the power supply. At the socket, 10 to 15 percent are added depending on the power supply. If you want it exact, use the metering socket as the source for
sensor.bitaxe_power.
Without Home Assistant: a Python script on a Raspberry Pi
If you run no home automation, you do not need one. The AxeOS interface can be addressed from any device on the network, and a Raspberry Pi or an old laptop with Python is enough to make the miner follow the surplus. The following script polls production from OpenDTU every five minutes, subtracts a fixed base load, adds the miner's current power and sets the level. It is deliberately short; you add the price and temperature conditions following the same pattern.
import requests, time

MINER = "http://192.168.1.50"
DTU = "http://192.168.1.60/api/livedata/status"   # OpenDTU
BASE_LOAD = 200   # watts, estimated household consumption

while True:
    try:
        pv = requests.get(DTU, timeout=5).json()["total"]["Power"]["v"]
        info = requests.get(f"{MINER}/api/system/info", timeout=5).json()
        surplus = pv - BASE_LOAD + info["power"]

        if surplus > 40:
            level = {"frequency": 525, "coreVoltage": 1150}
        elif surplus > 10:
            level = {"frequency": 400, "coreVoltage": 1050}
        else:
            level = None

        if level:
            requests.post(f"{MINER}/api/system/resume", timeout=5)
            requests.patch(f"{MINER}/api/system", json=level, timeout=5)
        else:
            requests.post(f"{MINER}/api/system/pause", timeout=5)
    except Exception as e:
        print("error, next attempt in 5 minutes:", e)
    time.sleep(300)
The script runs as a system service and needs no interface. If you want to extend it, append a line that writes the values to a CSV file; after a month you have the same evaluation as in the energy dashboard. The same principle applies to ioBroker and Node-RED: an HTTP node for the query, a comparison, an HTTP node for the command. The interface is the same for all of them, only the packaging differs.
Security: the miner does not belong on the internet
A point often missing from tutorials: the AxeOS interface has no login. Anyone who can reach the miner on the network can change pool, address and voltage. That is fine on your home network, because only your devices are there. It is not fine if the miner is reachable from the internet through port forwarding, and that happens faster than you think, for example when someone opens the router for remote access to the dashboard. The rules: no port forwarding to the miner, remote access only through the router's VPN or through Home Assistant Cloud (Nabu Casa), and if you have a guest WiFi or a separate VLAN for smart home devices, the miner belongs there, together with Home Assistant, so the two can reach each other.
Also check after every firmware update that pool and payout address are still correct. AxeOS keeps the settings during an update, but a glance takes ten seconds, and a miner that mines to a wrong address for months is the most expensive mistake you can make with a Bitaxe. How to run the update cleanly is in our setup guide.
Conclusion
With a handful of YAML, a Bitaxe becomes a load that follows sun, price and temperature without you ever touching a socket again. The core is the three-level automation from step 5; everything else is data sources you add as needed. If you combine your balcony kit with a Bitaxe Gamma 601 or Nerdaxe Gaia, a surplus sensor and a socket are enough. If you run a rooftop system and a NerdQaxe ++ or NerdOctaxe, throttling via frequency and voltage gets the most hashrate out of every watt of surplus. And in winter, the same automation with a room temperature limit becomes a small, adjustable heater.
If the miner is not running yet, start with our setup guide. Which device fits your system and what a kilowatt-hour earns in it is in the guide Bitcoin mining with solar power.
Frequently asked questions
Can I control a Bitaxe with Home Assistant?
Do I need a solar system for the automation?
Is throttling better than switching off?
How do I stop the automation from switching back and forth all the time?
Where do I get the electricity price if I have no dynamic tariff?
Which threshold price should I enter?
Does this also work with the Avalon Nano 3S?
Written by
Lukas Henning · Mining-Redakteur & Hardware-Experte
Lukas beschäftigt sich seit Jahren mit Bitcoin-Mining und betreibt mehrere Open-Source-Miner wie Bitaxe und NerdQaxe im eigenen Zuhause. Für Open Source Miners testet er Hardware, dokumentiert Setups und übersetzt Mining-Technik in verständliche Anleitungen: praxisnah, ehrlich und ohne Hype.


